Login
Start Free Trial Are you a business?? Click Here

Microscope Stage Micrometer, Calibration Film Ruler, Inspection Black Dot Point Gauge Card 0.3mm-2.0mm Reviews

5 Rating 1 Reviews
Read Boli Optics Reviews

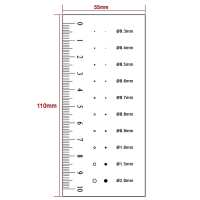
Quick OverviewPoint Gauge. Film Ruler Dimensions: 110x55mm. 100mm/100 Div. Diameters Range:
Dia. 0.3-2.0mm. RT02420201 Point GaugePoint GaugeFilm Ruler TypePoint GaugeFilm Ruler Dimensions110x55mmScale Range100mm/100 DivDiameters Range Dia. 0.3-2.0mmMaterialPET 
.tb_part
{
width: 100%;
border: solid 0px #ccc;
font-size:12px;
}
.tb_part tr
{
height: 30px;
line-height: 30px;
}
.tb_part td
{
white-space: nowrap;
}
.tb_part_1 td
{
white-space: wrap;
}
.normal{
border-left:solid 2px black;
border-right:solid 2px black;
}
.tb_part tr.normal td
{
border:solid 1px #ccc;
padding-right:5px;
}
.tb_part tr.normal:nth-child(2){
border-top:solid 2px black;
}
.tb_part tr.normal:first-child{
border:none;
}
.tb_part tr.normal:first-child td{
border:none;
font-weight:bold;
font-size:16px;
}
.end-border{
border-bottom:solid 2px black;
}
.tb_part tr.memo,.tb_part tr.memo td{
border:none;
}
Technical InfoInstructionsFilm RulerClose ΛScope of Use of the Point Gauge and Line Gauge of the Film Ruler:
They are usually used for product measurement, measuring size, angle and area, etc., their measurement are intuitive, size are accurate, and easy to use. They are used for product exterior inspection and comparison, to compare part size, positional deviation, check the size and position of silk screen printing, and determine whether the stains, cracks, scratches, grayscale and debris exceed the baseline. Through the standard setting of the exterior level, the inspector can standardize and unify the inspection standard of the product, and reduce the inspection judgment error of the product. Suitable for textile, printing, plastics, PCB, LCD, optoelectronics, communications, electronic components, machinery and other industries.
How to Use Comparison First, based on the inspection standard, determine a certain point on the point gauge as the standard point. When inspecting a tested point, first determine its approximate size and shape, then find the standard point on the point gauge, use this standard point to cover the tested point, if it can be covered, it will allow to pass, if it is not allowed to cover, it can't pass.
Film Rule Inspection Requirements: 1) Exterior Inspection: The external dimensions should conform to the parameters, the glass is transparent, free from mottling, impurities, and the edge is blunt and there is no chipping. The markup font is clear, no defects, and the tick marks is clear and unbroken. It is required that the exterior will have no wear marks, dirt, creases, and no printing blur or flashing. It is required that the packaging must not be folded, squeezed and come into contact with contaminants, keep the packaging materials dry, the packaging materials should be clean and free of stains, the packaging box will have no deformation and wrinkles, and the logo is neat.
2) Inspection accuracy:
 Usually a monocular microscope 480X, a stereo binocular microscope 90X are used for testing. The accuracy of the printer: 0.1mm, due to the influence of printer and material accuracy, the larger the size, the smaller the influence of manufacturing error; the smaller the size, the greater the influence of manufacturing error. 0.01--0.05mm, the error value is very large, so the tick marks value below 0.05mm is only used as a reference value, not as a measured value. 0.05--0.5mm, low precision, but can be used for reference; 0.5--0.75mm, error is less than 3%, can be used for general testing 0.8--1 mm or more, relatively high precision, error is within 0.01mm, can be used for measurement. In short, the film ruler can be used to quickly test and control the quality of the product parts with low precision and high output; the advantage is faster comparison and simple operation.
Precautions Calibration Certificate for this product is not included.
It is not recommended to use a device that is out of range or magnifying multiple to calibrate these gauges.
Note: Do not fold or rub the surface. When it is found that there are foreign objects or dirty marks on the surface, you can wipe it with cotton cloth dipped with alcohol. Do not wipe with water. Specific products can be customized to suit your needs.PackagingClose ΛAfter unpacking, carefully inspect the various random accessories and parts in the package to avoid omissions. In order to save space and ensure safety of components, some components will be placed outside the inner packaging box, so be careful of their inspection. For special packaging, it is generally after opening the box, all packaging boxes, protective foam, plastic bags should be kept for a period of time. If there is a problem during the return period, you can return or exchange the original. After the return period (usually 10-30 days, according to the manufacturer’s Instruction of Terms of Service), these packaging boxes may be disposed of if there is no problem.

About Boli Optics:

Boli Optics Microscope Supplier sells professional microscopes, microscope accessories, and magnifying lamps. We offer parts and accessories compatible with Leica, Olympus, Nikon, and Zeiss, and more. We supply research laboratories, medical centers, universities, industrial manufactures, factories, and more. Our engineers and technicians provide technical support and design & manufacture custom microscope products for your applications. Our products are manufactured under ISO 9001 quality control standards. We also provide OEM service. Since 1994, our talented team has been working in the optics industry and serving our customers whole-heartedly. Based in Southern California, we offer fast, same day shipping from our local warehouses.

Visit Product Page

Email:

sales@bolioptics.com

Location:

8762 Lanyard Court,
Rancho Cucamonga
California
91730

Happy with my order. It's an improvement over what I have. However, I haven't been able to get exactly what I need anywhere. I do a lot of measuring of small plant parts under a dissecting microscope for writing plant patents and rulers are bulky and hard to use. I like that the new rule has dots/circles down to 0.3mm/300microns. Sadly much of the material I'm working with falls in the 40micron to 2cm range. I get a lot of things in the 50micron to 1mm range. I think an ideal measuring device would consist of a metal or plastic stick type handle maybe 4-5" long with a scale mounted perpendicular to the axis of the stick so I could measure with one hand while manipulating the specimen in the other. if the rule was 2 cm long with some extra on each end and the graduations etched into stainless steel with one or 2 of the mm divided into tenths with a raised slightly higher graduation at the 0.5mm distance I think this tool might be in demand in various biological science facilities. If you could provide a graduation for 50 microns, a decent estimate could be made to the nearest 10 microns.
Helpful Report
Posted 3 years ago
Hello Russ, Thank you so much for your review of our Microscope Stage Micrometer, Calibration Film Ruler. We are glad to hear you were able to find an improvement for your application. We appreciate your detailed feedback. Best wishes, BoliOptics Team.
Posted 3 years ago