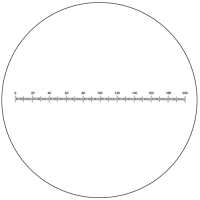
Quick OverviewSingle Line. Reticle Dimensions:
Dia. 24x1.5mm. 10mm/200 Div. Background Type: Positive. RT20101162 Single Line Reticle ( Dia. 24mm)ReticleReticle TypeSingle LineReticle Dimensions Dia. 24x1.5mmDiameter Tolerance-0.02一 -0.07mmScale Range10mm/200 DivReticle Coating TypeChrome PlatedLine
Width0.008-0.01mmCoating Thickness0.0003μmBackground TypePositiveMaterialGlassNet Weight0.002kg (0.004lbs)
.tb_part
{
width: 100%;
border: solid 0px #ccc;
font-size:12px;
}
.tb_part tr
{
height: 30px;
line-height: 30px;
}
.tb_part td
{
white-space: nowrap;
}
.tb_part_1 td
{
white-space: wrap;
}
.normal{
border-left:solid 2px black;
border-right:solid 2px black;
}
.tb_part tr.normal td
{
border:solid 1px #ccc;
padding-right:5px;
}
.tb_part tr.normal:nth-child(2){
border-top:solid 2px black;
}
.tb_part tr.normal:first-child{
border:none;
}
.tb_part tr.normal:first-child td{
border:none;
font-weight:bold;
font-size:16px;
}
.end-border{
border-bottom:solid 2px black;
}
.tb_part tr.memo,.tb_part tr.memo td{
border:none;
}
Technical InfoInstructionsReticleClose ΛReticle is generally also referred to as eyepiece reticle, or reticule, graticule, cross hair. Reticle is an optical component with a certain mark placed inside the eyepiece. Based on different applications, reticle can be used for measurement, calibration or aiming. Reticle is mainly used for the measurement of length, angle or area of the object to be measured under the microscope. The reticle measurement is a "non-contact measurement", that is, the measurement value is obtained by measuring the optical image without touching the object to be measured, which is very suitable for some small specimens, organisms, and irregular objects.
Eyepiece reticle has patterns of various shapes and sizes. Common types of eyepiece reticle are: straight, cross, mesh, circle, angle or combination shape. Between each grid it is also equidistant. However, for eyepiece reticle, one cannot read directly the number under the microscope, but convert firstly the multiple after magnification of the microscope objective lens. In short, after the object is being magnified by the objective lens, the real image of the object reaches the focal length of the eyepiece (10 mm below the fixed surface of the eyepiece), which is exactly the position of the eyepiece reticle, and what the eyepiece reticle reads is actually the image of the object after being magnified by the objective lens. Therefore, for the actual numerical value, the actual size of the image should be divided by the magnification of the objective lens.
In addition, for eyepiece reticle measurement, it can also be calibrated first by the objective micrometer before measurement. The method is: first, place an objective micrometer on the stage, after the focus is clear, record the magnification number of the objective. Then, the eyepiece reticle is overlapped with the scale pattern of the objective micrometer, so that the 0 points of the two are aligned, a scale value with a completely coincident scale is found backward, the grid values of the reticle eyepiece and the objective micrometer are respectively read and converted, and then the calibration value is used as the actual measurement value of the eyepiece reticle. This method is relatively more complicated. First, it is necessary to constantly convert the reading value and the calibration value of the eyepiece. Secondly, each time when the objective lens with different magnifications for observation is changed, it needs to be re-calibrated. This is only suitable for use in strongly repetitive microscope observations and work in order to be efficient.
Reticle Installation The reticle is installed in the eyepiece tube, and some eyepieces have been installed with reticle before leaving the factory. Since the requirements are different, users can also buy different reticle, and then install it on their own microscope. To install the reticle yourself, first make sure that the eyepiece of the microscope can be self-removed from the microscope eyepiece tube (generally, for microscopes, all their eyepieces can be removed, and some need to loosen the screws fastened on the microscope eyepiece tube to remove the eyepiece.)
For eyepieces on which reticle can be installed, you should pay attention to the following features and requirements: 1. Whether the tube wall of the eyepiece has a “mounting/installation surface” on which the reticle is placed. Generally, the eyepieces are located 10mm below the lower lens. This position is the focal plane of the eyepiece. The reticle is installed in this position to be clear. 2. Whether it has "Eyepiece Reticle Fix Ring". There are generally two ways for this fix ring: one is that there is the thread on the inner wall of the eyepiece tube, a metal fix ring with a card slot for positioning when using a screwdriver, by rotating the screwdriver, the reticle is pressed on the inner wall of the eyepiece. There is also a"plug ring type"fix ring, usually made of plastic material, which is elastic and inserted into the eyepiece tube, and then stuck on the inner wall of the eyepiece tube to press the reticle. If this"fix ring" is missing in the eyepiece tube, please contact your service provider to describe the above situation, and some service providers can provide this fix ring. 3. The tick marks of the reticle are all on top of the reticle. Generally, all reticles of the glass material have a certain thickness, and the tick marks of the reticle is on top of the reticle to ensure that all the tick marks are in the eyepiece focal plane (10 mm below the eyepiece) when using the reticle of different thickness. 4. Measure the diameter of the inner wall of the microscope eyepiece tube, to select the appropriate size of the reticle.
Upon understanding the above, if you need to choose reticle for different purpose of use, please visit Bolioptics.com to select reticle with a different pattern for use.PackagingClose ΛAfter unpacking, carefully inspect the various random accessories and parts in the package to avoid omissions. In order to save space and ensure safety of components, some components will be placed outside the inner packaging box, so be careful of their inspection. For special packaging, it is generally after opening the box, all packaging boxes, protective foam, plastic bags should be kept for a period of time. If there is a problem during the return period, you can return or exchange the original. After the return period (usually 10-30 days, according to the manufacturer’s Instruction of Terms of Service), these packaging boxes may be disposed of if there is no problem.
About Boli Optics:
Boli Optics Microscope Supplier sells professional microscopes, microscope accessories, and magnifying lamps. We offer parts and accessories compatible with Leica, Olympus, Nikon, and Zeiss, and more. We supply research laboratories, medical centers, universities, industrial manufactures, factories, and more. Our engineers and technicians provide technical support and design & manufacture custom microscope products for your applications. Our products are manufactured under ISO 9001 quality control standards. We also provide OEM service. Since 1994, our talented team has been working in the optics industry and serving our customers whole-heartedly. Based in Southern California, we offer fast, same day shipping from our local warehouses.
Visit Product PageEmail:
sales@bolioptics.com
Location:
8762 Lanyard Court,
Rancho Cucamonga
California
91730


